1
2
3
let vue = new Vue({ render: h => }).$mount('#app' )
vue-cli 配置齐全,大家也都习惯于使用 vue-cli 开发,因此可能会忽略了入口文件中 Vue 实例是怎么去 new 的,以及 #app 元素是怎么渲染到页面的。
(一)Vue 的初始化 1 2 3 4 5 6 7 8 9 10 11 const { initMixin } = require ('./init' )const { lifecycleMixin } = require ('./lifecycle' )const { renderMixin } = require ("./render" )function Vue (options ) this ._init(options) } initMixin(Vue) renderMixin(Vue) lifecycleMixin(Vue)
(二)模板编译 1 2 3 4 5 6 7 8 9 10 11 12 13 let vue = new Vue({ el: '#app' , data ( return { a: 1 , b: [1 ] } }, render (h ) return h('div' , { id : 'hhh' }, 'hello' ) }, template: `<div id='hhh' style="aa:1;bb:2"><a>{{xxx}}{{ccc}}</a></div>` }).$mount('#app' )
上面的代码有 el、template、render 以及 $mount,但毕竟只能渲染一次,那么究竟是谁来负责,或者说谁具备更高的优先级?
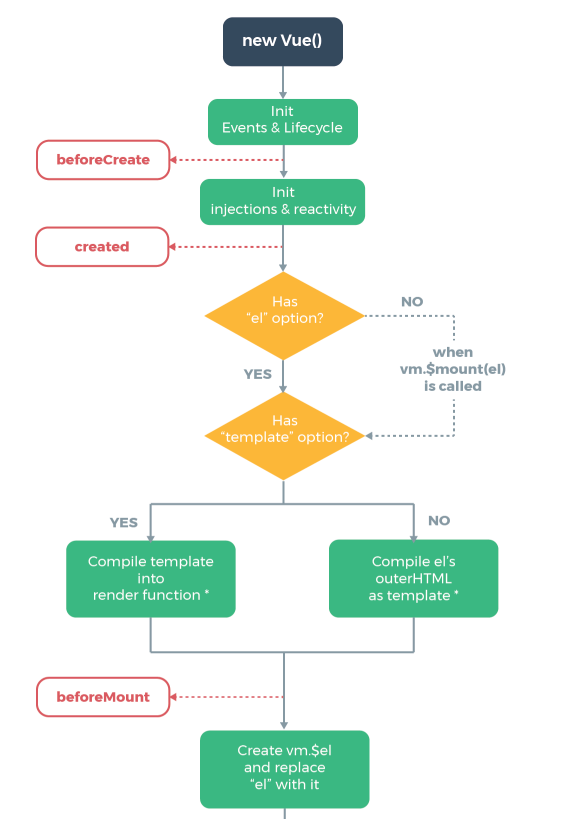
通过上图,总结如下:
根据有无 el 属性来决定渲染到哪个根节点上:有的话直接获取 el 根节点,没有的话调用 $mount 去获取根节点; 根据有无 render 和 template 来决定渲染哪个模板:若 render 函数存在,则优先执行。若不存在,则根据有无 template 来决定。如果有 template,则将其解析成 render 函数所需格式,并使用调用 render 函数渲染;如果没有 template,则将 el 根节点的 outerHTML 作为 template 解析成 render 函数所需格式,并使用调用 render 函数渲染。总之最后都统一使用 render 函数渲染。 initMixin 函数1 2 3 4 5 6 7 8 9 10 11 12 13 14 15 16 17 18 19 20 21 22 23 24 25 26 27 28 29 30 31 32 33 34 35 36 37 38 39 40 41 42 43 44 45 46 47 48 49 50 51 52 53 const { initState } = require ('./state' )const { compileToFunctions } = require ('./compiler/index.js' )function initMixin (Vue ) Vue.prototype._init = function (options ) const vm = this vm.$options = options initState(vm) if (vm.$options.el) { vm.$mount(vm.$options.el) } } Vue.prototype.$mount = function (el ) const vm = this const options = vm.$options el = document .querySelector(el) if (!options.render) { let template = options.template if (!template && el) { template = el.outerHTML } if (template) { const render = compileToFunctions(template) options.render = render } } return this } } module .exports = { initMixin: initMixin }
compileToFunctionscompileToFunctions 函数是模板编译的入口函数,包含 parse 和 generate 的执行,返回值是一个 render 函数。
1 2 3 4 5 6 7 8 9 10 11 12 13 14 15 16 17 18 19 20 21 22 23 24 const { parse } = require ('./parse.js' )const { generate } = require ('./codegen.js' )function compileToFunctions (template ) let ast = parse(template) let code = generate(ast) let renderFn = new Function (`with(this){ return ${code} }` ) return renderFn } module .exports = { compileToFunctions: compileToFunctions }
parse将 template 转为抽象语法树
首先需要各种规则匹配的正则表达式(开始标签,结束标签,花括号等)
createASTElement:将某一节点转为 AST 对象的函数handleStartTag:处理开始标签的函数handleEndTag:处理结尾标签的函数handleChars:处理文本节点的函数parse:转 AST 的入口函数1 2 3 4 5 6 7 8 9 10 11 12 13 14 15 16 17 18 19 20 21 22 23 24 25 26 27 28 29 30 31 32 33 34 35 36 37 38 39 40 41 42 43 44 45 46 47 48 49 50 51 52 53 54 55 56 57 58 59 60 61 62 63 64 65 66 67 68 69 70 71 72 73 74 75 76 77 78 79 80 81 82 83 84 85 86 87 88 89 90 91 92 93 94 95 96 97 98 99 100 101 102 103 104 105 106 107 108 109 110 111 112 113 114 115 116 117 118 119 120 121 122 123 124 125 126 127 128 129 130 131 132 133 134 135 136 137 138 139 140 141 142 143 144 145 146 147 148 149 150 151 152 153 154 155 156 157 158 159 160 161 162 163 164 165 166 167 168 169 170 171 172 173 174 175 176 177 178 179 const ncname = `[a-zA-Z_][\\-\\.0-9_a-zA-Z]*` ; const qnameCapture = `((?:${ncname} \\:)?${ncname} )` ; const startTagOpen = new RegExp (`^<${qnameCapture} ` ); const startTagClose = /^\s*(\/?)>/ ; const endTag = new RegExp (`^<\\/${qnameCapture} [^>]*>` , 'g' ); const attribute = /^\s*([^\s"'<>\/=]+)(?:\s*(=)\s*(?:"([^"]*)"+|'([^']*)'+|([^\s"'=<>`]+)))?/ ; let root, currentParentlet stack = []const ELEMENT_TYPE = 1 const TEXT_TYPE = 3 function createASTElement (tagName, attrs ) return { tag: tagName, type: ELEMENT_TYPE, children: [], attrs, parent: null } } function handleStartTag ({ tagName, attrs } ) const element = createASTElement(tagName, attrs) if (!root) { root = element } currentParent = element stack.push(element) } function handleEndTag (tagName ) const element = stack.pop() currentParent = stack[stack.length - 1 ] if (currentParent) { element.parent = currentParent currentParent.children.push(element) } } function handleChars (text ) text = text.replace(/\s/g , '' ) if (text) { currentParent.children.push({ type: TEXT_TYPE, text }) } } function parse (html ) while (html) { const textEnd = html.indexOf('<' ) if (textEnd === 0 ) { const startTagMatch = parseStartTag() if (startTagMatch) { handleStartTag(startTagMatch) continue } const endTagMatch = html.match(endTag) if (endTagMatch) { advance(endTagMatch[0 ].length) handleEndTag(endTagMatch[1 ]) continue } } let text if (textEnd > 0 ) { text = html.substring(0 , textEnd) } if (text) { advance(text.length) handleChars(text) } } function parseStartTag ( const start = html.match(startTagOpen) let match if (start) { match = { tagName: start[1 ], attrs: [] } advance(start[0 ].length) let end, attr while (!(end = html.match(startTagClose)) && (attr = html.match(attribute))) { advance(attr[0 ].length) attr = { name: attr[1 ], value: attr[3 ] || attr[4 ] || attr[5 ] } match.attrs.push(attr) } if (end) { advance(1 ) return match } } } function advance (n ) html = html.substring(n) } return root } module .exports = { parse }
generate将 AST 转换成 render 函数格式的数据
匹配花括号
确保 AST 解析成 render 函数所需格式
1 2 3 4 5 6 7 8 9 10 11 12 13 14 15 16 17 18 19 20 21 22 23 24 25 26 27 28 29 30 31 32 33 34 35 36 37 38 39 40 41 42 43 44 45 46 47 48 49 50 51 52 53 54 55 56 57 58 59 60 61 62 63 64 65 66 67 68 69 70 71 72 73 74 75 76 77 78 79 80 81 const defaultTagRE = /\{\{((?:.|\r?\n)+?)\}\}/g ; function gen (node ) if (node.type === 1 ) { return generate(node) } else { const text = node.text if (!defaultTagRE.test(text)) { return `_v(${JSON .stringify(text)} )` } let lastIndex = (defaultTagRE.lastIndex = 0 ); const tokens = [] let match, index while ((match = defaultTagRE.exec(text))) { index = match.index if (index > lastIndex) { tokens.push(JSON .stringify(text.slice(lastIndex, index))) } tokens.push(`_s(${match[1 ].trim()} )` ) lastIndex = index + match[0 ].length } if (lastIndex < text.length) { tokens.push(JSON .stringify(text.slice(lastIndex))) } return `_v(${tokens.join('+' )} )` } } function generate (el ) const children = getChildren(el) const code = `_c('${el.tag} ',${el.attrs.length ? `${genProps(el.attrs)} ` : "undefined" } ${children ? `,${children} ` : "" } )` ;; return code } function genProps (attrs ) let str = '' for (let i = 0 ; i < attrs.length; i++) { const attr = attrs[i] if (attr.name === 'style' ) { const obj = {} attr.value.split(';' ).forEach(item => const [key, value] = item.split(':' ) obj[key] = value }) attr.value = obj } str += `${attr.name} :${JSON .stringify(attr.value)} ,` } return `{${str.slice(0 , str.length)} }` } function getChildren (el ) const children = el.children if (children && children.length) { return `${children.map(c => gen(c)).join(',' )} ` } } module .exports = { generate }
(三)模板渲染 我们已经把模板转换成了 render 函数所需的格式,那么 Vue 接着会根据如下步骤将其生成真实 DOM 并展示到页面。
1 $mount --> mountComponent --> _render执行获得虚拟DOM --> _update执行将虚拟DOM转真实DOM并渲染
1 2 3 4 5 6 7 8 function mountComponent (vm, el ) vm.$el = el; vm._update(vm._render()) return vm }
renderMixin 函数执行 render 函数,获得虚拟 DOM
1 2 3 4 5 6 7 8 9 10 11 12 13 14 15 16 17 18 19 20 21 22 23 24 25 26 27 28 29 30 31 32 33 const { createElement, createTextNode } = require ('./vdom/index' )function renderMixin (Vue ) Vue.prototype._render = function ( const vm = this const { render } = vm.$options const vnode = render.call(vm) return vnode } Vue.prototype._c = function (...args ) return createElement(...args) } Vue.prototype._v = function (text ) return createTextNode(text) } Vue.prototype._s = function (val ) return val === null ? '' : typeof val === 'object' ? JSON .stringify(val) : val } } module .exports = { renderMixin }
下面是创建虚拟 DOM 的具体所需函数以及类
1 2 3 4 5 6 7 8 9 10 11 12 13 14 15 16 17 18 19 20 21 22 23 24 25 26 class Vnode constructor (tag, data, key, children, text ) this .tag = tag this .data = data this .key = key this .children = children this .text = text } } function createElement (tag, data= {}, ...children ) const key = data.key return new Vnode(tag, data, key, children) } function createTextNode (text ) return new Vnode(undefined , undefined , undefined , undefined , text) } module .exports = { createElement, createTextNode }
lifecycleMixin 函数1 2 3 4 5 6 7 8 9 10 11 12 13 14 15 16 const { patch } = require ('./vdom/patch' )function lifecycleMixin (Vue ) Vue.prototype._update = function (vnode ) const vm = this vm.$el = patch(vm.$el, vnode) || vm.$el } } module .exports = { mountComponent, lifecycleMixin }
patch 将虚拟 DOM 转真实 DOM 并渲染)
1 2 3 4 5 6 7 8 9 10 11 12 13 14 15 16 17 18 19 20 21 22 23 24 25 26 27 28 29 30 31 32 33 34 35 36 37 38 39 40 41 42 43 44 45 46 47 48 49 50 51 52 53 54 55 56 57 58 59 60 61 62 63 64 65 66 67 68 69 70 71 72 73 74 75 function patch (oldVnode, vnode ) const isRealElement = oldVnode.nodeType if (isRealElement) { const oldElm = oldVnode const parentElm = oldElm.parentNode const el = createElm(vnode) parentElm.insertBefore(el, oldElm.nextSibling) parentElm.removeChild(oldVnode) return el } } function createElm (vnode ) const { tag, data, key, children, text } = vnode if (typeof tag === 'string' ) { vnode.el = document .createElement(tag) updateProperties(vnode) children.forEach(child => return vnode.el.appendChild(createElm(child)) }) } else { vnode.el = document .createTextNode(text) } return vnode.el } function updateProperties (vnode ) const newProps = vnode.data || {} const el = vnode.el for (let key in newProps) { if (key === 'style' ) { for (let styleName in newProps.style) { el.style[styleName] = newProps.style[styleName] } } else if (key === 'class' ) { el.className = newProps.class } else { el.setAttribute(key, newProps[key]) } } } module .exports = { patch }